Showing posts with label VMware Horizon VDI. Show all posts

Monday, June 22, 2020

Untrusted view connection error , unable to login to Vmware Horizon Vdi from Horizon Clients

Untrusted view connection error. Unable to login to Vmware Horizon Vdi from Horizon Clients and Thin Clients.

"Error: An SSL error occurred" error during launching vdi from Horizon Client. 

Problem:

VMware Horizon Vdi users are unable to login in to vdi. Horizon client gives error - Untrusted View Connection"

Untrusted View Connection Error on HP T5745 Thin Client

Reason:

1. SSL certificate is expired on the view connection server or the loadbalancer (in case multiple connection servers under load balancer) 
2. The client is not trusting the ssl certificate. Root and intermediate certificate may not be available in the trusted root certificate store in the client device. 
3. System date is wrong in the client device. 

Solution:

1. Renew the ssl certificate on connection servers or loadbalancer if it's expired. 

2. Import root and intermediate certificates on local trusted root certificate store in case of both windows and Linux clients. 

3. Adjust date and time in client device. If it's Linux client, preferred to configure ntp. 

4. Disable ssl check on horizon client ssl settings (not recommend) 


Saturday, December 7, 2019

VMware Horizon 7- Error while attempting to connect to view composer

VMware Horizon 7 Gives error "Error while attempting to connect to view composer" While adding View Composer:


Symptoms:

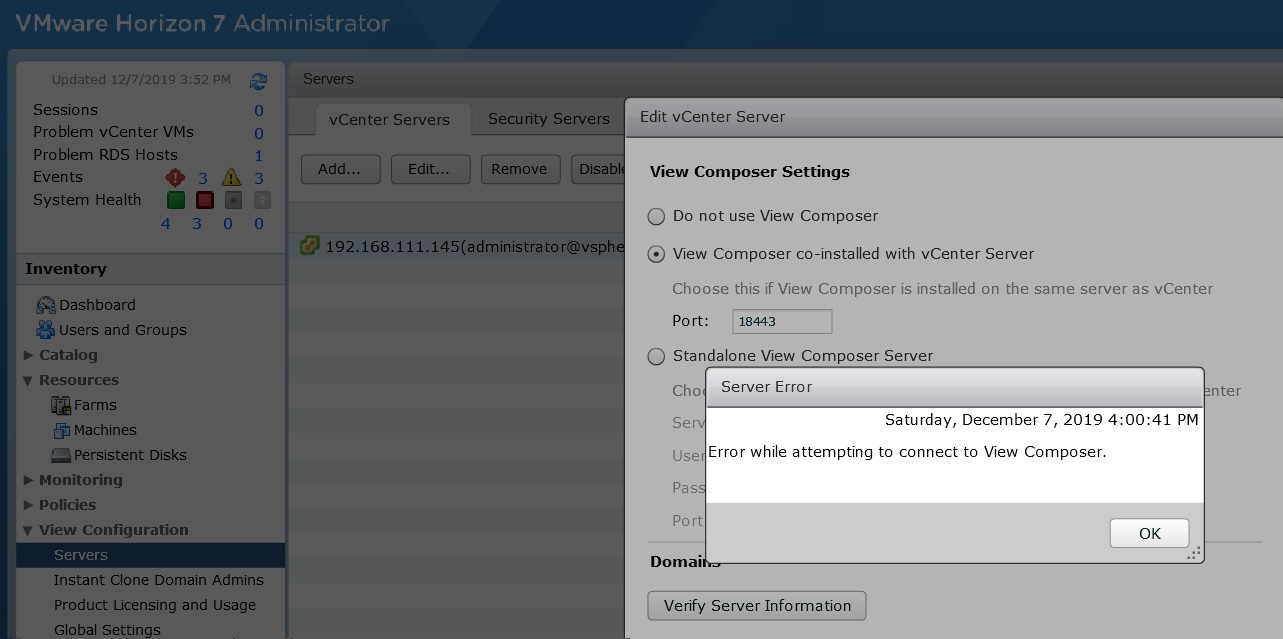
VMware Horizon 7 Administrator give an error "Error while attempting to connect to view composer" while trying to configure View Composer.


Reason:

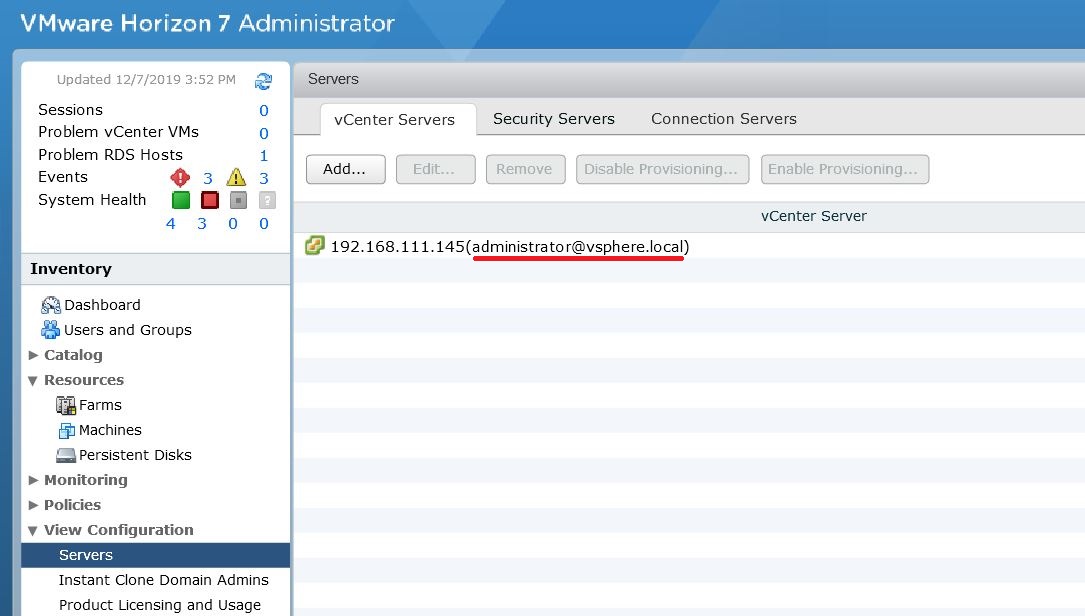
      The User account used to add Vcenter Server on View Administrator don't have sufficient permission on the View Composer. This mostly occurs whenever vCenter is integrated in View Administrator with vCenter SSO Admin, example: administrator@vsphere.local. 


Pre-Requisites Check:

1. If Composer is Co-installed with Vcenter, Always better to install Composer with an AD ID which have administrator privilege in Vcenter local Server and Vcenter Service.
2. Add Vcenter on View Administrator using the AD ID which is used to install composer and should have administrator rights on Vcenter.

Resolution:

1. Go to "Servers > vCenter Servers" TAB. Right Click Vcenter and click "Edit"


2.  Click Edit.
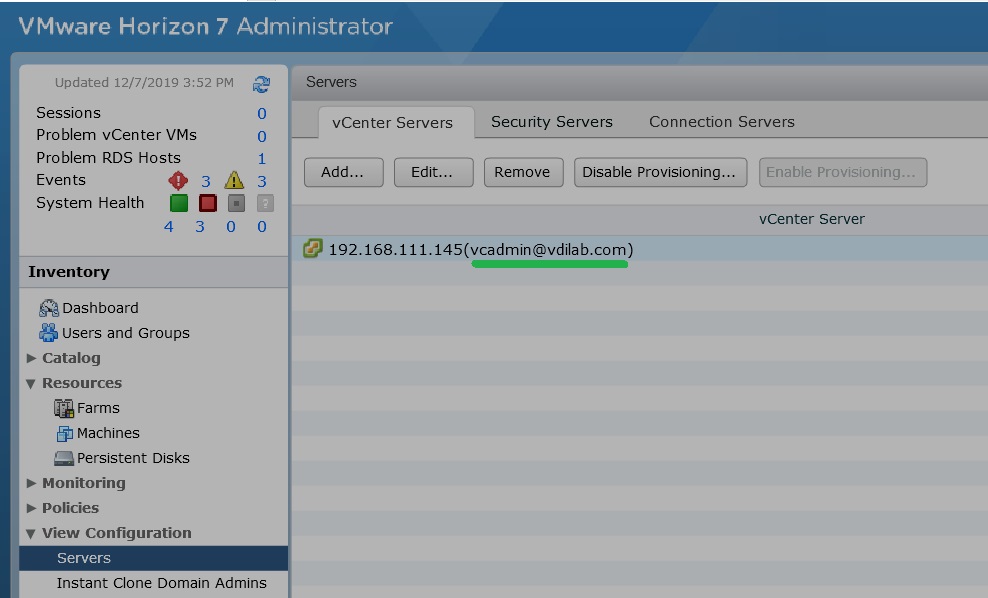
Provide new credential which used for install Composer. Ensure this ID have administrator privilege in vCenter.
Click OK.


3. Now Vcenter Has been added using AD ID which have permission on Composer and Vcenter.


4. Now try to edit composer settings. Composer will be added successfully.


Tuesday, November 26, 2019

Instant-Clone Pool creation on VMware Horizon 7 Step By Step

About Instant-Clone:

     Instant-Clone Pool is an automated Pool available in Horizon 7 and later versions of VDI deployments. Like View Composer Linked-Clone pool, Instant-Clone also will have a Master Image which have OS, applications and Horizon Agent with Instant-option enabled on Horizon Agent. Instant Clone Pool will have a Parent VM which creates and manage by VMware Horizon and Instant-Clones VMs which will share disk and memory with parent VMs. 

     Since Parent VM is fully managed by Horizon, we cannot do any modification on Instant Clone Parent VM. But we can do modification on Master Image whenever we need modification on VDI desktop and can be apply those modification to pool using "Push Image Operation".

     Unlike Linked-Clone, Instant-Clone parent VM always will be in Powered On mode. All Instant-Clones VMs will be created as powered on state by vmFork technology and all domain join and VM configuration will happen during initial VM Power on process.

Advantages Of Instant-Clone

1. Very fast provisioning compared to Linked-Clones.
2. Very less storage Usage because Instant-Clones are sharing disk with parent.
3. Easy and less maintenance Window during image update with Image Push Operation.
4. No need additional servers for Instant-Clones.

Requirements of Instant-Clone Pool

1. Horizon 7 or later with Enterprise License.
2. VMware vSPhere 6.0 Update 1 or later.
3. Windows 7 or Windows 10 Pool VM. WIndows 8 and 8.1 not supported.
4. Sphere Infrastructure with Distributed Switch. Standard switch is not supported.

Step By Step Procedure to Create Instant-Clone Pool:

a) Master Image Creation:

1. Create Master Image with supported OS. 
2. Install VMware Tools and all application which should be included in master image.
3. Install Horizon Agent with Instant-Clone module enabled.
4. Shutdown VM and Create a Virtual Machine Snapshot.

b) Instant Clone initial Configuration on Horizon 7 Administrator Console

1. Go to View Configuration > Instant clone Domain Admins.
2. Click Add
3. Choose domain and enter user ID and password of domain user which have certain privileges. Instant Clone Domain Admin User Privileges: More details


4. Click OK.

c) Instant-Clone Pool Creation:

1. Go to "Catalog > Desktop Pools" Click "Add"
2. Choose "Automated Desktop Pool", Next
3. Choose Floating , Next
4. Choose "Instant Clones", Next.
5. Follow the standard pool creation procedure and ensure choosing right master image which we created earlier, and finish the pool creation wizard.


Monday, November 25, 2019

Using DirectFlex On VMware User Environment Manager (UEM)

VMware User Environment Manager FlexEngine

   When user login to windows with UEM enabled, FlexEngine starts automatically and it reads the UEM configuration from UEM config share and will import all User personalization settings from UEM profile Archive Share. When user logout, all changes happened on the application and its registry details will be captured and exported to UEM Profile Archive share depends up on the application settings to be captured mentioned in UEM Config settings.

But depends up on number of applications UEM manages and size of those files, user logon time will be impacted. The login time for the user who did more customization on their application will be very huge. Here we can take advantage of VMware UEM DirectFlex feature.

DirectFlex

   DirectFlex imports application settings from UEM Profile Archive Share when user launches the application and exports back the application settings to UEM Profile Archive Share while user close the application, instead of import/export operation happen during login and logout. With this feature, FlexEngine improve its efficiency. Without DirectFlex, all application settings will import on session during each login and will export back to profile share on each log off, which will impact allover performance of the infrastructure. But through DirectFlex, Application settings are getting imported only which user is used during the session, and all DirectFlex configured settings will be skipped during user login process.


How to Enable DirectFlex:

1. Select the Application Configuration file from "VMware User Environment Manager - Management Console"..

2. Go to "DirectFlex" Tab.
3. Check "Enable DirectFlex for this Config File"

4. Select the executable by browsing the UNC path of ThinApp executable file.


Sunday, November 24, 2019

VMware UEM: Manage ThinApp Sandbox Using Vmware User Environment Manager (UEM)

VMware ThinApp

       VMware ThinApp is an application virtualization solution from VMware. ThinApp utility makes an application into portable format. Potable application can be stored on centralized location as file share and multiple user can launch the application via shortcut of executable portable file. ThinApp application will launch as a virtual bubble on top of operating system and the application will be isolated from the OS layer.

About VMwareThinApp

ThinApp SandBox

       Since ThinApp application is isolated from the OS layer, The changes and customization user do on the ThinApp application will not affect on native OS, registry or any application. Instead of that, all changes are stored in a directory called "Sandbox". So when next time the application launches again, ThinApp application launches incorporated with Sandbox application settings. The default location of ThinApp Sandbox is %AppData%\Thinstall\"ThinApp Name"

Example: Default Sandbox Location of "Adobe Photoshop CS6" ThinApp will be %AppData%\Thinstall\"Adobe Photoshop CS6"

About ThinApp Sandbox


ThinApp Application Delivery via UEM (User Environment Manager)


         ThinApp application can be deliver to user via placing portable executable shortcut on users desktop. This can be achieved by using VMware User Environment Manager (UEM).

Steps:

1. Open "VMware User Environment Manager - Management Console"
2. Go to "User Environment" Menu.
3. Click "Shortcuts"


4. Click "Create"
5. Give ThinApp name, Shortcut name and share UNC Path as below figure.


6. Click "Save".

Note: "Conditions" tab on above image can be used to deliver the shortcut as per conditions like specific AD user, AD group, IP Address etc.


Managing VMware ThinApp Sandbox Using UEM (User Environment Manager)


      ThinApp Sandbox folder can be import and export during user session using UEM custom configuration file. Sandbox will be imported to sandbox location (Example: %Appdata%/ThinInstall) and exported from Sandbox location during user logon or during Application execution (If directFlex is enabled).

Steps:

1. Open "VMware User Environment Manager - Management Console".
2. Go to " Personalization" menu.
3. Select "Applications"
4. Click "Create Config File" from menu bar.
5. Select "Create Custom Config File", click "OK"
6. Give name as Application Name, Example: Adobe photoshop CS6.
7. Select newly created config File, Add sandbox location to configure import /Export Sandbox during login and logout.


DirectFlex

     If the ThinApp Sandbox size is huge, it will consume more time to import the SandBox files during user Session login and it will affect user login time as well. So here we can take advantage of DirectFlex feature. DirectFlex feature imports the Sandbox while user launches the application instead of importing the Sandbox during user login.

More About DirectFlex

How to Enable DirectFlex:

1. Select the Configuration file.
2. Go to "DirectFlex" Tab.
3. Check "Enable DirectFlex for this Config File"
4. Select the executables by browsing the UNC path of ThinApp executable file.


Saturday, November 16, 2019

Horizon 7: Add Vcenter 5.5 U2 Fails with error: Unable to verify vCenter certificate

Symptoms:

Adding VMware Vcenter Server 5.5 on Horizon 7 Connection server fails with certificate error "Unable to verify vCenter certificate"

Reason:

VMware Vcenter 5.0, 5.1 and 5.5 works with TLSv1.0 Security protocol. But on VMware Horizon 7 and later version, TLSv1.0 is disabled by default. So you might receive a certificate error while trying to integrate Vcenter 5.x server with VMware Horizon 7.x.

Solution:

Enable TLSv1.0 on Horizon View Connection Server.

Steps:

1. Login to Horizon View Connection Server host, open ADSI Edit utility.


2. Right click on "ADSI Edit", click on "Connect to..."


3. Choose "Select or type a Distinguished Name or Naming Context" 
and type "DC=vdi, DC=vmware, DC=int". 
Choose Computer and type "localhost:389".
Click "OK"


4.  Double click and expand "Default Naming Context[Localhost:389].
Expand "DC=vdi, DC=vmware, DC=int"
Expand "OU=Properties"
Select "OU=Global"
Right Click on "CN=Common", Click "Properties"


5. Double Click to open "pae-ClientSSLSecureProtocols".
Fill the value "\LIST:TLSv1.2,TLSv1.1,TLSv1" click "OK".
Click "OK" and close ADSI Edit utility.


6. Restart Horizon View Connection Server Service or reboot server to take the effect.


Now we can try to add Vcenter Server 5.5 to Horizon View Administrator.

                                                              VMware KBASE


Tuesday, August 27, 2019

VMware UEM: Managing Mapped Network Printers via VMware User Environment manager

VMware UEM: Managing Mapped Network Printers / Shared Printers


Two ways we can manage mapped network printer (Shared printer) through VMware UEM.
  1. Manually Mapping Network printer from "User Environment > Printer Mappings" option.
  2. Capturing User mapped Network printer settings by creating "UEM Config file" in "Personalization>Windows Settings" Option.

1. Manually Mapping Network printer from "User Environment > Printer Mappings" option:

a) Open "VMware User environment Manager - Management Console"
b) Go to "User Environment TAB > Printer Mappings"


VMware-UEM-Printer-Mapping

c) Click "Create" and Give Printer Name and "Printer Share details" as showing in example Screenshot.


VMware-UEM-NETWORK-Printer-Mapping


d) Click Conditions

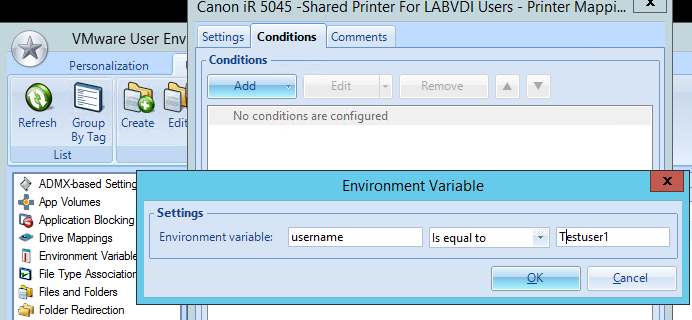
e) Add conditions as per the use case. In my example, I am going to map this printer to username: "Testuser1"


VMware-UEM-CONDITION

VMware-UEM-CONDITION-USERNAME

f) Click "OK", "Save" and exit.

g) Login to the user session and verify the printer is mapped correctly.


2.) Capturing End User mapped Network printer by creating "Config file" file in "Personalization>Windows Settings" Option.
       VMware User Environment Manager (UEM) can be configured in such a way that, the network mapped printer adding by end user from a VDI non-persistent session can be captured by UEM profile and will be persistent during next session. Through this feature, Horizon VDI Users can resolve the head ache of disappearing mapped network printer in each new session of  Horizon Floating non-persistent VDI desktops. UEM will be capturing the Registry settings related to Printer mapping and will be imported during next session logon , and will be exported during session logoff.

   The procedure to create "UEM Config file" for Mapped network printer to capture in UEM Profile is described in below article.


VMware UEM: Capturing User mapped Network printer by creating "Config file" in UEM Management Console.

    VMware User Environment Manager (UEM) can be configured in such a way that, the mapped network printer adding by end user from a VDI non-persistent session can be captured by UEM profile and will be persistent during next session. Through this feature, Horizon VDI Users can resolve the head ache of disappearing mapped network printer in each new session of  Horizon Floating non-persistent VDI desktops. UEM will be capturing the Registry settings related to Printer mapping and will be imported during next session logon , and will be exported during session logoff.

Creating "UEM Config file" to Capture Network Printer Settings:

1. Open " VMware User Environment Manager - Management Console", Go to " Personalization" tab.

2. Click Windows Settings.


3. Click " Create Config File" and Choose " Choose a Windows Common Setting" and "Next"


UEM-CREATE-CONFIG-FILE-WINDOWS-SETTINGS

 4. Choose "Printers - Mapped Network Printers Only", "Next"


VMWARE-UEM-CREATE-CONFIG-PRINTERS-MAPPED-NETWORK


5. Give the config file name as showing in below example. "FInish"

VMWARE-UEM-CREATE-CONFIG-PRINTERS-MAPPED-NETWORK

6. Now "Network Printers" configuration file has been created as shown in below picture.

VMWARE-UEM-CREATE-CONFIG-PRINTERS-MAPPED-NETWORK


7. By default, UEM profile will capture Network printers settings for all users. We can restrict it by configuring conditions on "Conditions" tab.

8. Login to the VDI user session, Configure a new network printer, Log off, login again, and verify printer is persistent in next session.


Wednesday, March 27, 2019

On HP Thinpro based Thin Clients, locally added printers disappears after reboot.

Symptoms:

On HP Thinpro based Thin Clients, locally added printers disappears after reboot.

In VDI environments, locally attached printers can be used in two ways. "USB redirection" and "printer redirection".
For USB redirection, Printer driver must be installed on VDI desktops (master images in case of Non persistant VDI)
But Printer redirection allows the user to add local printer to VDI desktop without install driver on master image.
In printer redirection, drivers has to be installed on the Thin clients. locally added printer will be redirected to remote VDI.

But whenever we add local printer to an "HP Thipro Based Thin Clients" (HP T5740, T520), it is observed that added printers are disappearing on each reboot.

Solution:

After adding the printer on ThinPro control pannel, reboot the "CUPS" service (Common Unix Printing System)


Steps:


1. Add the printers from "Administrative Mode > Peripherals > Printers.
2. Go to "Administrative Mode > Advance > X Terminal.
3. type, "service cups restart" and press enter.
4. Reboot the Thin Client and ensure recently added printer existing.


VMware Thinapp: Launching Native installed Application from VMware ThinApp Bubble

VMware Thinapp: Launching Native installed Application from VMware ThinApp Bubble.

1. In normal desktops, while launching some of the native installed application, some other application add-ins or tool bar are loading by default. But in VDI environments if the application is virtualized by VMware ThinApp, native applications will not recognize Thinapp packaged
applications.
2. Some natively installed application may require integration with Thinapp packaged application, but native application usually cannot
recognize Thinapp packaged application

Example:

I have VMware VDI environment using non-Persistant linked clone VDI desktops. Office 2013 is installed natively on all VDI desktops, but
Endnote 8 application is using via VMware ThinApp. In normal desktop environments, while launching "MS Word", Endnote tool bar menu will appear.
Since here I am using EndNote via Thinapp, Natively installed "Word" will not recognise ThinApp Packaged EndNote. Endnote package is packaged
application which is not installed on the machine. Endnote ThinApp always launch on Virtual bubble.

Solution:

Execute the native installed application from virtual bubble. Natively installed application will execute inside the virtual bubble and all

native and packaged components will be availble on lauched application.

Steps:

1. Create a shortcut file of natively installed application. Example "word.lnk" which points to "C:\Program Files\Microsoft Office\Office15\Winword.exe"
2. Go to "ThinApp project directory" and  Copy the shortcut file inside %drive_C%.
3. Edit package.ini and add below entry to enable new Thinapp Entry point.

[WordWithEndNote.exe]
Source=%drive_C%\word.lnk
ReadOnlyData=Package.ro.tvr

4. Rebuild the Thinapp by executing "build.bat" inside project directory.
5. Once build complete, new entry point will be created with name "WordWithEndNote.exe".
6. Publish this entry point to users who need to work "word" with "Endnote"
7. Configure File Type Association (FTA) accordingly to ensure all work files are lauching with this entry point by default.

Wednesday, February 20, 2019

Duplicate "ViewClient_Client_ID" Issues on VMware Horizon Clients and Multi-Session Issues

Multi-Session Issue on VMware Horizon View Due to Duplicate "ViewClient_Client_ID"


Problem: 

          When we enable the “Allow multiple sessions per user” settings in VDI Pool, a user that connect from different client devices receive different desktop sessions. To reconnect to an existing desktop session, user must use the same device from which that session initiated. If we do not enable this settings user will always reconnect to his existing desktop session, regardless of the client device that they use. 

        All client devices having randomly generated “ViewClient_Client_ID” and multi-session feature is working depending on this client id. But whenever we are using HP Thinpro (Ubuntu) Thin Clients with latest versions for Horizon Clients and capturing and deploying Thin Client images using Hp Device manager and USB flash, these is a chance of duplicating ViewClient_Client_ID in multiple client devices. When multiple devices have the same client_ids, it causes the first session to disconnect when trying to connect from the second device. 

Symptoms:


     Whenever VDI user trying to login to multiple sessions using same User ID, first session may disconnect with error "The connection to the remote computer has been closed due to a new connection request". The Horizon view VDI Pool will not allow user to login in multiple session even if "Allow multiple Sessions per user" option is checked.

How to verify the client id?

        Once logged in to VDI session, client_id is visible on below registry path.

HKCU\Volatile Environment\ViewClient_Client_ID

        Also we can find client id by executing “SET” command from VDI session.

Solution:

         The client_id is randomly generating and saving by a client while connecting to the VDI session first time. To avoid duplicate client_ids, first we have to do factory reset the image, then install required Horizon version and do all customization, but don’t login to VDI session before capturing the image. Deploy the captured images to the VDI clients which image have blank client_id. All deployed devices will randomly generate different client_id while first login.


Wednesday, December 5, 2018

Finding Client MAC Address From VMware Horizon VDI Session

Finding VDI Client Device MAC Address From VMware Horizon VDI Session


      While administering VDI environments, most of the time we will struggle to get Thin Client or VDI Client MAC address for troubleshooting, re-imaging or for providing remote shadow support. Below article explains about a simple "visual basic" script to get this information. In my case, I kept this script on network share and configured a Desktop shortcut on all VDI machines.

       When a user connects or reconnects to a View desktop, Horizon Client gathers information about the client system and View Connection Server sends that information to the remote desktop.

       View Agent writes the client computer information to the system registry path "HKEY_CURRENT_USER\Volatile Environment" on VDI desktops.

Registry values:

ViewClient_MAC_Address
ViewClient_IP_Address

Below script will read the HKEY_CURRENT_USER\Volatile Environment\ViewClient_MAC_Address registry parameter and will give Visual Basic output as below screenshot.


''#### VBS Script ####''
On Error Resume Next
Dim objShell, strTemp
Set objShell = WScript.CreateObject("WScript.Shell")
strTemp = "HKEY_CURRENT_USER\Volatile Environment\ViewClient_MAC_Address"
WScript.Echo "VDI Client MAC Address : " & objShell.RegRead(strTemp) 
''### END ####''