Thursday, December 12, 2019

VMware vCenter Server Appliance 6.5 and 6.7 Root Password Reset Procedure

Root Password Reset Procedure for VMware vCenter Server Appliance 6.5 and 6.7


      Below steps explains the step by step root password reset procedure for VCSA 6.5 and 6.7. This solution is applicable specifically for VCSA 6.5 and Later versions only. This solution will not work for Earlier versions of VMware VCSA. 

Steps:

1. Take snapshot for VCSA appliance before doing this activity.

2. Reboot the VCSA appliance, press "e" while Photon Screen Appears. 


3. It will redirect to GRUB edit menu.


4. Find the line which start with word "linux", and add the entry "rw init=/bin/bash" at ending of the line after putting a space, Press "F10" to continue.


5. Run the command " mount -o remount,rw /"


6. Run the command "passwd" to change the password. Enter the new password twice


7. Un mount the file system by command "umount /"

8. Reboot the VCSA by the command "reboot -f"


9. Now Root password is successfully reset for VSCA Appliance.


Saturday, December 7, 2019

VMware Horizon 7- Error while attempting to connect to view composer

VMware Horizon 7 Gives error "Error while attempting to connect to view composer" While adding View Composer:


Symptoms:

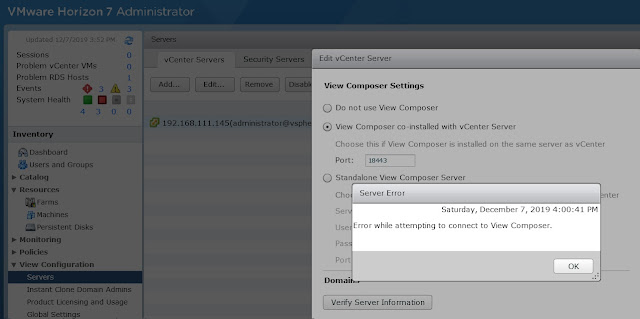
VMware Horizon 7 Administrator give an error "Error while attempting to connect to view composer" while trying to configure View Composer.


Reason:

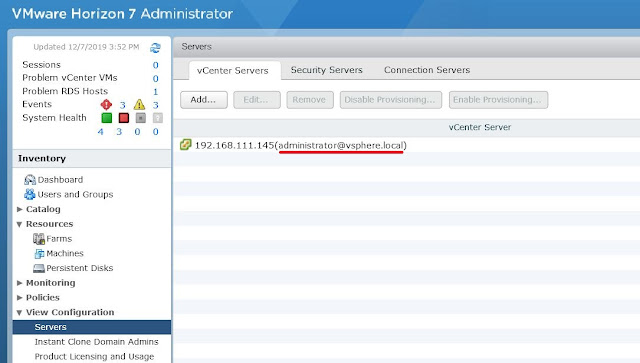
      The User account used to add Vcenter Server on View Administrator don't have sufficient permission on the View Composer. This mostly occurs whenever vCenter is integrated in View Administrator with vCenter SSO Admin, example: administrator@vsphere.local. 


Pre-Requisites Check:

1. If Composer is Co-installed with Vcenter, Always better to install Composer with an AD ID which have administrator privilege in Vcenter local Server and Vcenter Service.
2. Add Vcenter on View Administrator using the AD ID which is used to install composer and should have administrator rights on Vcenter.

Resolution:

1. Go to "Servers > vCenter Servers" TAB. Right Click Vcenter and click "Edit"


2.  Click Edit.
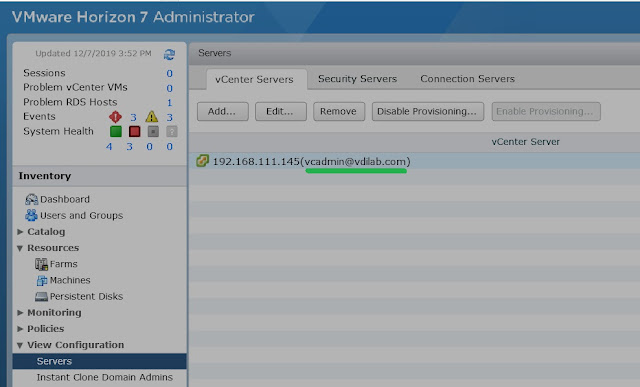
Provide new credential which used for install Composer. Ensure this ID have administrator privilege in vCenter.
Click OK.


3. Now Vcenter Has been added using AD ID which have permission on Composer and Vcenter.


4. Now try to edit composer settings. Composer will be added successfully.


Friday, December 6, 2019

Create Bulk Users in Active Directory via Power Shell

Create Bulk Users in Active Directory via Power Shell


The procedure of bulk user creation in Active directory mainly included 3 Steps.

1. Create A CSV File with Users Information.
2. Create a Power Shell Script
3. Run Power Shell Script.

1. Create A CSV File with Users Information:

Create a CSV file with Users information and ensure the CSV file have at least "Firstname" , "Lastname", "Username", "Password" and "OU" information.


Sample CSV and Script Download Link

2. Crate a Power Shell Script:


Create a Power Shell Script with below codes. Edit only "CSV file location" and "UserPrincipalName" parameter which is highlighted below.

Keep CSV file in a location which is specified in script.

###############Script Start#######################

# Importing AD cmdlets
Import-Module activedirectory
  
#Set $ADUsers variable from file Bulkusers.csv
$ADUsers = Import-csv C:\scripts\bulkusers.csv

#Looping for each user with user information 
foreach ($User in $ADUsers)
{
#Assign data to variable by reading the filed

$Username = $User.username
$Password = $User.password
$Firstname = $User.firstname
$Lastname = $User.lastname
$OU = $User.ou
    $email      = $User.email
    $streetaddress = $User.streetaddress
    $city       = $User.city
    $zipcode    = $User.zipcode
    $state      = $User.state
    $country    = $User.country
    $telephone  = $User.telephone
    $jobtitle   = $User.jobtitle
    $company    = $User.company
    $department = $User.department
    $Password = $User.Password


#Checking User ID already Exist or not
if (Get-ADUser -F {SamAccountName -eq $Username})
{
#give a warning If user does exist
Write-Warning "A user account with username $Username already exist in Active Directory."
}
else
{
#If ID not exit, will proceed with user creation

        #Account will be created in OU specified in CSV
New-ADUser `
            -SamAccountName $Username `
            -UserPrincipalName "$Username@vdilab.com" `
            -Name "$Firstname $Lastname" `
            -GivenName $Firstname `
            -Surname $Lastname `
            -Enabled $True `
            -DisplayName "$Lastname, $Firstname" `
            -Path $OU `
            -City $city `
            -Company $company `
            -State $state `
            -StreetAddress $streetaddress `
            -OfficePhone $telephone `
            -EmailAddress $email `
            -Title $jobtitle `
            -Department $department `
            -AccountPassword (convertto-securestring $Password -AsPlainText -Force) -ChangePasswordAtLogon $True
            
}
}

###############Script End #######################


3. Execute Power Shell Script.

Pre-Requisites:

a) Need to run this script from Machine where RSAT Tools installed.
b) The User should have rights to add Users in AD.

Steps:

1. Open "Windows Power Shell ISE" with "Run As Administrator"
2. Click File > Open and browse to the power Shell script, and click open.
3. Once script is load, click "Green Run button" to execute script.


4. Script has been executed and users are created as per csv file.


Sample CSV and Power Shell Script Download URL


Wednesday, December 4, 2019

Vmware Vcenter 6.0 AD integration steps

Configure AD (Active Directory) Authentication In Vcenter 6.0

      By default, Vmware Vcenter Authentication will be based on Vcenter Single Sign-on (SSO) admin user which we configure during installation. If we want to configure Vcenter with AD Authentication, we have to add AD in identity source configuration in Vcenter.

Steps:

1. Login to vSphere Web Client with SSO Administrator Credential.


2. Go to "Administration > Single Sign-on > Configuration


3.  Open the Tab "Identity Sources"
4. Click "+" icon to add identity source.
5. Select the proper Identity Source Type as per our Vcenter Installation type.


A) Select Identity Source Type as " Active Directory (Integrated Windows Authentication)" if the Vcenter Server is Domain Joined machine.

On Domain Name, Enter "FQDN of Domain Name"

Choose " Use Machine Account" and Click "OK"


B) Select Identity Source Type as " Active Directory As An LDAP Server" if the Vcenter server is a non-domain joined machine.

Name                     : The Display name of Identity Source
Base DN For Users   : Distinguish Name of Domain
Domain Name         : FQDN of Domain name
Domain Alias           : NetBios name of Domain 
Base DN for Groups : Distinguish Name of Domain
Primary Server URL : ladp://<AD_Server>:389
User Name              : AD user which have at least browse permission 
Password                : Password of user.


6. Click "OK"

7. Now we successfully added Active Directory As identity sources.


Configure Vcenter Permission For AD Users:

1.  Go to " Administration > Global Permissions > Manage 
2. Click Green "+" button to add new user or group.


3. Click "Add" to Add user or group from Identity Sources.


4. Choose " AD Domain Name" from drop Down menu.


5. Search User or Group we want to give permission on this Vcenter.
In my example, I am giving Permission for User "vdiuser1"
Select User from search result, click "Add", Click "OK"


6. Assign proper role we want to assign to this user. Choose role from drop down menu, Click "OK"
In My example, I am giving "Administrator" rights to "VDIuser1"


7.  Now AD User "VDIuser1" as been assigned with administrator privilege in this Vcenter.


Tuesday, November 26, 2019

Instant-Clone Pool creation on VMware Horizon 7 Step By Step

About Instant-Clone:

     Instant-Clone Pool is an automated Pool available in Horizon 7 and later versions of VDI deployments. Like View Composer Linked-Clone pool, Instant-Clone also will have a Master Image which have OS, applications and Horizon Agent with Instant-option enabled on Horizon Agent. Instant Clone Pool will have a Parent VM which creates and manage by VMware Horizon and Instant-Clones VMs which will share disk and memory with parent VMs. 

     Since Parent VM is fully managed by Horizon, we cannot do any modification on Instant Clone Parent VM. But we can do modification on Master Image whenever we need modification on VDI desktop and can be apply those modification to pool using "Push Image Operation".

     Unlike Linked-Clone, Instant-Clone parent VM always will be in Powered On mode. All Instant-Clones VMs will be created as powered on state by vmFork technology and all domain join and VM configuration will happen during initial VM Power on process.

Advantages Of Instant-Clone

1. Very fast provisioning compared to Linked-Clones.
2. Very less storage Usage because Instant-Clones are sharing disk with parent.
3. Easy and less maintenance Window during image update with Image Push Operation.
4. No need additional servers for Instant-Clones.

Requirements of Instant-Clone Pool

1. Horizon 7 or later with Enterprise License.
2. VMware vSPhere 6.0 Update 1 or later.
3. Windows 7 or Windows 10 Pool VM. WIndows 8 and 8.1 not supported.
4. Sphere Infrastructure with Distributed Switch. Standard switch is not supported.

Step By Step Procedure to Create Instant-Clone Pool:

a) Master Image Creation:

1. Create Master Image with supported OS. 
2. Install VMware Tools and all application which should be included in master image.
3. Install Horizon Agent with Instant-Clone module enabled.
4. Shutdown VM and Create a Virtual Machine Snapshot.

b) Instant Clone initial Configuration on Horizon 7 Administrator Console

1. Go to View Configuration > Instant clone Domain Admins.
2. Click Add
3. Choose domain and enter user ID and password of domain user which have certain privileges. Instant Clone Domain Admin User Privileges: More details


4. Click OK.

c) Instant-Clone Pool Creation:

1. Go to "Catalog > Desktop Pools" Click "Add"
2. Choose "Automated Desktop Pool", Next
3. Choose Floating , Next
4. Choose "Instant Clones", Next.
5. Follow the standard pool creation procedure and ensure choosing right master image which we created earlier, and finish the pool creation wizard.


Monday, November 25, 2019

Using DirectFlex On VMware User Environment Manager (UEM)

VMware User Environment Manager FlexEngine

   When user login to windows with UEM enabled, FlexEngine starts automatically and it reads the UEM configuration from UEM config share and will import all User personalization settings from UEM profile Archive Share. When user logout, all changes happened on the application and its registry details will be captured and exported to UEM Profile Archive share depends up on the application settings to be captured mentioned in UEM Config settings.

But depends up on number of applications UEM manages and size of those files, user logon time will be impacted. The login time for the user who did more customization on their application will be very huge. Here we can take advantage of VMware UEM DirectFlex feature.

DirectFlex

   DirectFlex imports application settings from UEM Profile Archive Share when user launches the application and exports back the application settings to UEM Profile Archive Share while user close the application, instead of import/export operation happen during login and logout. With this feature, FlexEngine improve its efficiency. Without DirectFlex, all application settings will import on session during each login and will export back to profile share on each log off, which will impact allover performance of the infrastructure. But through DirectFlex, Application settings are getting imported only which user is used during the session, and all DirectFlex configured settings will be skipped during user login process.


How to Enable DirectFlex:

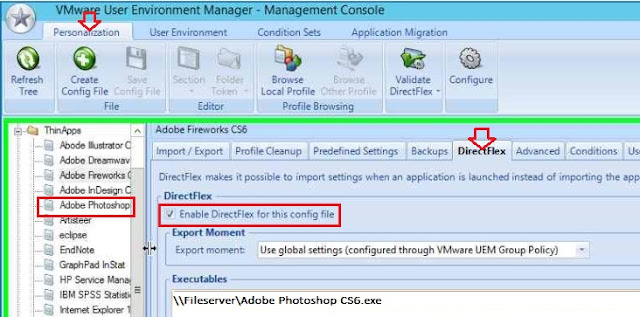
1. Select the Application Configuration file from "VMware User Environment Manager - Management Console"..

2. Go to "DirectFlex" Tab.
3. Check "Enable DirectFlex for this Config File"

4. Select the executable by browsing the UNC path of ThinApp executable file.


Sunday, November 24, 2019

VMware UEM: Manage ThinApp Sandbox Using Vmware User Environment Manager (UEM)

VMware ThinApp

       VMware ThinApp is an application virtualization solution from VMware. ThinApp utility makes an application into portable format. Potable application can be stored on centralized location as file share and multiple user can launch the application via shortcut of executable portable file. ThinApp application will launch as a virtual bubble on top of operating system and the application will be isolated from the OS layer.

About VMwareThinApp

ThinApp SandBox

       Since ThinApp application is isolated from the OS layer, The changes and customization user do on the ThinApp application will not affect on native OS, registry or any application. Instead of that, all changes are stored in a directory called "Sandbox". So when next time the application launches again, ThinApp application launches incorporated with Sandbox application settings. The default location of ThinApp Sandbox is %AppData%\Thinstall\"ThinApp Name"

Example: Default Sandbox Location of "Adobe Photoshop CS6" ThinApp will be %AppData%\Thinstall\"Adobe Photoshop CS6"

About ThinApp Sandbox


ThinApp Application Delivery via UEM (User Environment Manager)


         ThinApp application can be deliver to user via placing portable executable shortcut on users desktop. This can be achieved by using VMware User Environment Manager (UEM).

Steps:

1. Open "VMware User Environment Manager - Management Console"
2. Go to "User Environment" Menu.
3. Click "Shortcuts"


4. Click "Create"
5. Give ThinApp name, Shortcut name and share UNC Path as below figure.


6. Click "Save".

Note: "Conditions" tab on above image can be used to deliver the shortcut as per conditions like specific AD user, AD group, IP Address etc.


Managing VMware ThinApp Sandbox Using UEM (User Environment Manager)


      ThinApp Sandbox folder can be import and export during user session using UEM custom configuration file. Sandbox will be imported to sandbox location (Example: %Appdata%/ThinInstall) and exported from Sandbox location during user logon or during Application execution (If directFlex is enabled).

Steps:

1. Open "VMware User Environment Manager - Management Console".
2. Go to " Personalization" menu.
3. Select "Applications"
4. Click "Create Config File" from menu bar.
5. Select "Create Custom Config File", click "OK"
6. Give name as Application Name, Example: Adobe photoshop CS6.
7. Select newly created config File, Add sandbox location to configure import /Export Sandbox during login and logout.


DirectFlex

     If the ThinApp Sandbox size is huge, it will consume more time to import the SandBox files during user Session login and it will affect user login time as well. So here we can take advantage of DirectFlex feature. DirectFlex feature imports the Sandbox while user launches the application instead of importing the Sandbox during user login.

More About DirectFlex

How to Enable DirectFlex:

1. Select the Configuration file.
2. Go to "DirectFlex" Tab.
3. Check "Enable DirectFlex for this Config File"
4. Select the executables by browsing the UNC path of ThinApp executable file.


Saturday, November 16, 2019

Horizon 7: Add Vcenter 5.5 U2 Fails with error: Unable to verify vCenter certificate

Symptoms:

Adding VMware Vcenter Server 5.5 on Horizon 7 Connection server fails with certificate error "Unable to verify vCenter certificate"

Reason:

VMware Vcenter 5.0, 5.1 and 5.5 works with TLSv1.0 Security protocol. But on VMware Horizon 7 and later version, TLSv1.0 is disabled by default. So you might receive a certificate error while trying to integrate Vcenter 5.x server with VMware Horizon 7.x.

Solution:

Enable TLSv1.0 on Horizon View Connection Server.

Steps:

1. Login to Horizon View Connection Server host, open ADSI Edit utility.


2. Right click on "ADSI Edit", click on "Connect to..."


3. Choose "Select or type a Distinguished Name or Naming Context" 
and type "DC=vdi, DC=vmware, DC=int". 
Choose Computer and type "localhost:389".
Click "OK"


4.  Double click and expand "Default Naming Context[Localhost:389].
Expand "DC=vdi, DC=vmware, DC=int"
Expand "OU=Properties"
Select "OU=Global"
Right Click on "CN=Common", Click "Properties"


5. Double Click to open "pae-ClientSSLSecureProtocols".
Fill the value "\LIST:TLSv1.2,TLSv1.1,TLSv1" click "OK".
Click "OK" and close ADSI Edit utility.


6. Restart Horizon View Connection Server Service or reboot server to take the effect.


Now we can try to add Vcenter Server 5.5 to Horizon View Administrator.

                                                              VMware KBASE


Tuesday, November 12, 2019

VMware vSphere 6.7 : Content Libraries Configuration

Content Libraries in vSphere 6.7

Content Libraries are the centralized repository on VMware vcenter to store ISO images, VM templates and vApps Templates. With Content Libraries, We can share the contents from one Vcenter to multiple Vcenter instances on same location or geographically different location if http traffic is available between Vcenter Servers.


Local Content Libraries:


   Local Content Libraries are the one which is created locally on the vcenter. It can be published so that other vcenters can subscribe the content library.
Subscribed Content Libraries:


  The option to subscribe the content library which is published by other Vcenter servers are called as Subscribed Content Libraries. We can use the content of Subscribed Content Libraries but we cannot do contribution on this type of Libraries.

How To Configure Local Content Libraries:


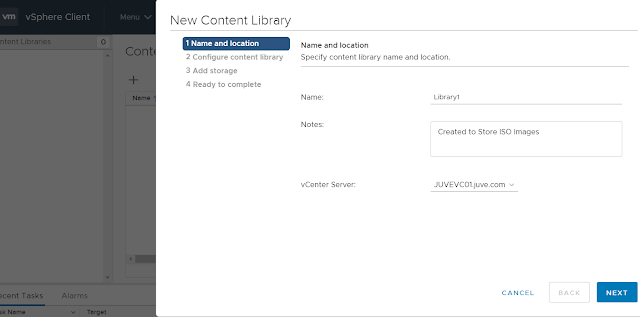
1. Login to Vmware vSPhere Web Client, Go to "Menu > Content Libraries"


2.  Give Content Library Name in "Name Filed", Choose the Vcenter, Then Click "Next"


3.  Select "Local Content Library".


   a)"Enable Publishing" option is using to publish this local Content Libraries for other Vcenter Servers.
   b)"Optimize for Syncing over HTTP" option is used to optimize low resource usage and faster syncing of content over HTTP while syncing content to remote location Vcenter server Subscription.
Note: If Optimize for Syncing over HTTP is enabledLocal Vcenter instance cannot use the content to deploy VMs images.


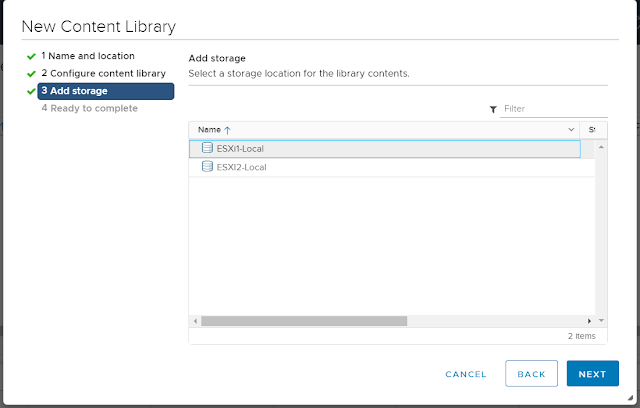
4.  Select the Datastore where you want to store your contents, click "Next"


5. Click Finish to complete new Content Library Creation Process.


6. Local Content Library has been created with name "Library1".


Now OVF templates, vApps templates and ISO images contents can be upload to the library as library items. 


Refer Below VMware Article to know more details about Content Libraries: 

                                           Content Libraries