Saturday, August 31, 2019

Dell Power Edge R740 R720 R710 Server iDRAC Configuration Procedure (IPMI)

iDRAC Configuration for Dell Power Edge R740 R720 R710 Servers (IPMI)


Once the new Server is Rack mounted, We have to configure iDRAC to access the server remotely and manage the server.
      
Below Steps explaining Step wise procedure to configure iDARC on Dell Power Edge R710/R720/R740 model Servers.

1. Power on Server and Press "F2" to enter to System set up.

Dell-Power-Edge-R710-R720-R740-POST-Screen-RAID-BIOScaption
 

2. Click on "iDARC Settings" to configure iDRAC.


Dell-Power-Edge-R710-R720-R740-IDRAC-SETTINGS


3. Click on "Network" to configure iDRAC Management IP Settings.

Dell-Power-Edge-R710-R720-R740-IDRAC-IP-SETTINGS

4. Set Static IP Address by Choosing " DHCP Disable" and enter enter IP Address, Sub net mask and Gateway. Click "Back" and "Finish" to save the configuration.

Dell-Power-Edge-R710-R720-R740-IDRAC-IP-SETTINGS

5. Go to "iDRAC Settings" again, and Go to " User Management" to set password for "root" user.

Dell-Power-Edge-R710-R720-R740-IDRAC-ROOT-PASSWORD

6. Enter the new password for "root" user. Click "back" and "Finish" to save configuration.

Now iDARC IP Address and credentials has been configured!!

Now This server Can be managed remotely via a browser,

Exit IDARC and System Setup console by "ESC Key"

Dell-Power-Edge-R710-R720-R740-IDRAC-ROOT-PASSWORD

7. Open a Browser from any machine on same network, Put newly configured  iDRAC IP Address on the Browser and enter.

Dell-Power-Edge-R710-R720-R740-IDRAC-LOGIN-PAGE


8. On the iDARC login page, type "root" and newly configured password. then "Submit"

Dell-Power-Edge-R710-R720-R740-IDRAC-HOME-PAGE


9. iDRAC has been logged in. Now Administrators can remotely manage, Install OS, and monitor this Server.


Dell Power Edge R710 Server RAID Configuration Procedure.

Configuring RAID on Dell Power Edge R710/R720/R610 Servers.


      By default, Dell Power Edge R710 Server will be shipping from factory with "Dell PERC 6/i RAID Controller". Dell PERC 6/i RAID Controller is supported with RAID 1, 5, 6, 10, 50 and 60 RAID Levels.

Configuring RAID on Dell Power Edge R710 Server.

1.)  Power on the Server and connect the local console via Monitor or iDRAC (IPMI) console.
2.) Press "CTRL+R" When it is prompting to enter RAID Configuration Utility.


3)  It will redirect to " RAID Controller BIOS Configuration Utility". Here we have option to Create the RAID Array. This Utility have 3 menus. 

    a). VD Management - To Create/Delete/Manage Virtual Disk /Logical Disk/ Array
    b). PD Management - To View/Manage Physical Disk
    c) . Ctrl Mgmt - To Manage RAID Controller Settings.

RAID BIOS Console
4) Press "Ctrl+N" to go to "PD Mgmt" Menu and Verify the physical disk status. Here we have 2 physical Disks each have 136 GB of Capacity., Both disk are showing "Online". 


5) Press "Ctrl+N" again to go to "Ctrl Mgmt" to see the RAID Controller Settings. Here we can see the Controller details and its Firmware version.


6) Press "Ctrl+N" and come back to "VD Mgmt" to configure the RAID Array.

Press "F2", and Choose "Create New VD" option to create new RAID Array.


7) It will redirect to "Virtual Disk Management" Page. 

Here we can choose the RAID Level, The physical disk which we are going to choose for RAID, VD Name and VD Size.

Since We have 2 Physical Disks, we will get the RAID level options for RAID 0 and RAID 1 only.

Here I am going to create "RAID 1" Array for mirroring two Physical Disks.


8) Press Enter on "RAID Level" and Choose "RAID 1".


9) Press "TAB" and select both Physical Disks to make member of this RAID 1 Array.
Choose all other options as default and press "OK" to create Array.


10) Press "OK" to Create.


11. Now New Array (Virtual Disk) has been created, its name is " Virtual Disk 0". But It should be initialized before we can use it. 


12. To initialize, Press "F2" Then"Initialization" then enter on " Fast Init." to initialize quickly. It will take around 1 minute to finish initialization.


13. Press "Yes" on the warning. All data will be destroyed on the disks if any data present.


14.  Once Initialization is finished, we will get a message as below.

Now we have create a RAID Array with RAID 1 (Mirroring). Now Server is ready for OS installation and further configurations.


15. Press "ESC" to exit from RAID BIOS Utility" and Press "OK"


16. Press "CTRL+ALT+DEL" to reboot the Server.


17. On next reboot, After prompting the RAID BIOS option, Server will recognize the newly created Array (Virtual Disk/logical disk) As shown in below image.


18. Now Server is ready with " RAID 1 " array for OS Installation.

Tuesday, August 27, 2019

VMware UEM: Managing Mapped Network Printers via VMware User Environment manager

VMware UEM: Managing Mapped Network Printers / Shared Printers


Two ways we can manage mapped network printer (Shared printer) through VMware UEM.
  1. Manually Mapping Network printer from "User Environment > Printer Mappings" option.
  2. Capturing User mapped Network printer settings by creating "UEM Config file" in "Personalization>Windows Settings" Option.

1. Manually Mapping Network printer from "User Environment > Printer Mappings" option:

a) Open "VMware User environment Manager - Management Console"
b) Go to "User Environment TAB > Printer Mappings"


VMware-UEM-Printer-Mapping

c) Click "Create" and Give Printer Name and "Printer Share details" as showing in example Screenshot.


VMware-UEM-NETWORK-Printer-Mapping


d) Click Conditions

e) Add conditions as per the use case. In my example, I am going to map this printer to username: "Testuser1"


VMware-UEM-CONDITION

VMware-UEM-CONDITION-USERNAME

f) Click "OK", "Save" and exit.

g) Login to the user session and verify the printer is mapped correctly.


2.) Capturing End User mapped Network printer by creating "Config file" file in "Personalization>Windows Settings" Option.
       VMware User Environment Manager (UEM) can be configured in such a way that, the network mapped printer adding by end user from a VDI non-persistent session can be captured by UEM profile and will be persistent during next session. Through this feature, Horizon VDI Users can resolve the head ache of disappearing mapped network printer in each new session of  Horizon Floating non-persistent VDI desktops. UEM will be capturing the Registry settings related to Printer mapping and will be imported during next session logon , and will be exported during session logoff.

   The procedure to create "UEM Config file" for Mapped network printer to capture in UEM Profile is described in below article.


VMware UEM: Capturing User mapped Network printer by creating "Config file" in UEM Management Console.

    VMware User Environment Manager (UEM) can be configured in such a way that, the mapped network printer adding by end user from a VDI non-persistent session can be captured by UEM profile and will be persistent during next session. Through this feature, Horizon VDI Users can resolve the head ache of disappearing mapped network printer in each new session of  Horizon Floating non-persistent VDI desktops. UEM will be capturing the Registry settings related to Printer mapping and will be imported during next session logon , and will be exported during session logoff.

Creating "UEM Config file" to Capture Network Printer Settings:

1. Open " VMware User Environment Manager - Management Console", Go to " Personalization" tab.

2. Click Windows Settings.


3. Click " Create Config File" and Choose " Choose a Windows Common Setting" and "Next"


UEM-CREATE-CONFIG-FILE-WINDOWS-SETTINGS

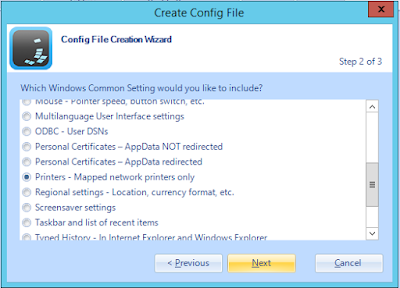
 4. Choose "Printers - Mapped Network Printers Only", "Next"


VMWARE-UEM-CREATE-CONFIG-PRINTERS-MAPPED-NETWORK


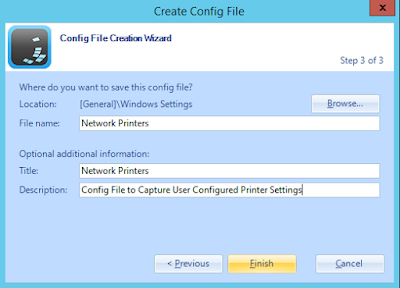
5. Give the config file name as showing in below example. "FInish"

VMWARE-UEM-CREATE-CONFIG-PRINTERS-MAPPED-NETWORK

6. Now "Network Printers" configuration file has been created as shown in below picture.

VMWARE-UEM-CREATE-CONFIG-PRINTERS-MAPPED-NETWORK


7. By default, UEM profile will capture Network printers settings for all users. We can restrict it by configuring conditions on "Conditions" tab.

8. Login to the VDI user session, Configure a new network printer, Log off, login again, and verify printer is persistent in next session.


Monday, August 26, 2019

No disk with sufficient space to install XenServer on was found

Symptom:


"No disk with sufficient space to install XenServer on was found" error during Citrix XenServer 7.x Installation process.


XENSERVER-INSTALL-ERROR-NO-DISK-WITH-SUFFICIENT-SPACE


Cause:

As per Citrix XenServer System Requirements, 46GB of minimum disk space should be available locally on server to proceed the XenServer installation.

Please refer below article about XenServer 7.1 System Requirements.

https://docs.citrix.com/en-us/xenserver/7-1/system-requirements.html

Resolution:

Ensure minimum 46 GB of Locally attached disk available on XenServer Host. Upgrade local HDD to minimum 46 GB or more.


Tuesday, August 20, 2019

Windows 10 Remote Desktop Session Disconnect Automatically After 2 Minute Idle Session.

Symptom:

Windows 10 Remote Desktop Session log off Automatically After 2 Minutes of Idle RDP Session with message.


Reason:


Microsoft Local Group policy settings forcing RDP Session to log off after 2 min idle session.


Resolution:


1. Got run, type "gpedit.msc"


2. Expand "Computer Configuration\Administrative Templates\Windows Components\Remote Desktop Services\Remote Desktop Session Host\Session Time Limits"

     If there is any active policy, edit it to "Not Configured" State as below picture.

3. Expand "User Configuration\Administrative Templates\Windows Components\Remote Desktop Services\Remote Desktop Session Host\Session Time Limits"

     If there is any active policy, edit it to "Not Configured" State as below picture.

4. Reboot the PC.


Remote-Desktop-Session-Host-Session-Time-Limits


Saturday, August 17, 2019

VMware Converter Giving Error "A general system error occurred: SSL Exception: error:14077102:SSL routines:SSL23_GET_SERVER_HELLO:unsupported protocol"

Symptom:


During VMware Physical to Virtual Conversion Process, VMware converter giving error related to SSL and not proceeding the conversion process.


Error:  "VMware Converter Giving Error "A general system error occurred: SSL Exception: error:14077102:SSL routines:SSL23_GET_SERVER_HELLO:unsupported protocol"


A-general-system-error-occurred:-SSL-Exception:-error:14077102:SSL-routines:SSL23_GET_SERVER_HELLO:unsupported-protocol

Reason

VMware vCenter Converter Standalone 5.x and 6.x by default the converter worker encrypts the data stream using SSL. Encrypting the traffic increases security, but it can decrease performance. Some times process will not continue unless manually disable the SSL Encryption.

Solution:

Step 1: Disable SSL:

a) Open the file "converter-worker.xml" from path "C:\programdata\VMware\VMware vCenter Converter Standalone" in notepad.
b) Locate the line <useSsl></useSsl>. It is located inside the <nfc> tag and has a value of "true".
c) Change the value to "false"

Step 2: Enable TLS1.0

a) Open the below 3 files  from path "C:\programdata\VMware\VMware vCenter Converter Standalone" in notepad.

converter-agent.xml 
converter-server.xml 
converter-worker.xml

b) Find the value "123422720" in file and replace it with "56313856".

c) Do same on file 

converter-client.xml

located at path C:\Program Files (x86)\VMware\"VMware vCenter Converter Standalone".


d) Open "Services",  restart all services related to "VMware Converter"
e) retry VMware Conversion process.