Sunday, December 20, 2020

Adding New Network In hpe synergy OneView Step By Step

 Adding New Network In hpe synergy OneView

While adding new network in Hp Synergy OneView, We should add new network on "Networks", "Network Set", Logical Interconnect" and Logical interconnect group.

Steps: 

1. Add new Network in "Networks"


2. Add "New Network" in "Logical Interconnect Group" by editing "Logical Interconnect group" , then edit "Uplink set"


Note: Skip this step if "Logical Interconnect Group" is configured with "Network Set" instead of "Networks"

3. Go to Corresponding "Logical Interconnect", There will be warning on Logical Interconnect related to inconsistency.

Note: Skip this step if "Logical Interconnect Group" is configured with "Network Set" instead of "Networks"

4. Go to "Actions", Click "Update from group"


Note: Skip this step if "Logical Interconnect Group" is configured with "Network Set" instead of "Networks"

5. Add "New Network" in Network set.


Monday, December 7, 2020

VMware vSPhere 6.7 : Error during guest introspection VM Deployment "Unable to access agent offline bundle at https://NSXManager. Failed to download metadata"

Problem:

Unbale to deploy NSX guest introspection in vSPhere 6.7. It throwing below errors.

VMware vSPhere 6.7 : Error during guest introspection VM Deployment "Unable to access agent offline bundle at https://NSXManager. Failed to download metadata"

Unable to access agent offline bundle at https://NSXManager . Cause : <esxupdate-response> <version>1.50</version> <error errorClass="MetadataDownloadError"> <errorCode>4</errorCode> <errorDesc>Failed to download metadata.


Reason:

Any one of the below issues can be the cause of this error.

1. Wrong DNS Server IP is configured in ESXi Hosts.
2. DNS port 53 is not opened in firewall between ESXi and DNS Server.
3. ESXi, vCenter and NSX Manager are not resolving by forward and reverse DNS lookup.

Solution:

Verify the DNS configuration and required DNS ports configuration in firewall for ESXi, vCenter and NSX Manager.


Monday, November 23, 2020

Install sticky notes or any Microsoft Store Apps in windows 10 for all users PowerShell

Problem:

Unable to install "Sticky Notes" application in Windows 10 for all users or machine level. Whenever we install Sticky Notes from "Microsoft Store" or by "Add-AppxPackage" PowerShell command, Application is getting installed for specific User.

Reason:

Installation of Apps from "Microsoft Store" or via "Add-AppxPackage" will get installed in user level.

To install for all users, we need to install with command "Add-AppxProvisionedPackage".

Solution:

Pre-Requisites:

We should have Microsoft Volume Licensing portal access to download "Windows 10 Inbox Apps" iso image. We have to install the application using PowerShell Command "Add-AppxProvisionedPackage" with appxbuldle files but this bundle we cannot download from public Microsoft Download portal. 

Steps:

1. Login to Microsoft Volume Licensing portal and search for "Windows 10 Inbox Apps"

2. Download the ISO image depends up of the Windows 10 build and Architecture you using.

The ISO file name will be similar to "SW_DVD9_NTRL_Win_10_1903_32_64_ARM64_MultiLang_App_Update_X22-01657.iso"

3. Mount the ISO image and copy the application files we want to install. We have to copy .Appxbundle and .xml file. In my example, I have to copy below highlighted 2 files.


4. Execute Command "Add-AppxProvisionedPackage -Online -PackagePath "C:\Build\amd64fre\Microsoft.MicrosoftStickyNotes_8wekyb3d8bbwe.appxbundle" –LicensePath "C:\Build\Microsoft.MicrosoftStickyNotes_8wekyb3d8bbwe.xml"


Note: Change the path of .appxbundle and .xml files depends up on where you kept this files.

5. We will get the command output similar as shown in the screenshot. Now the Windows app is installed in machine level and application will be available for all users.


Saturday, October 10, 2020

Printer Settings Could not be saved. This Operation is not Suppported.

Problem:

Unable to change the driver of an added printer in print server or normal machine. It gives error "Printer Settings Could not be saved. This Operation is not Suppported." 


Printer Settings Could not be saved. This Operation is not Suppported

Solution :

1. Disable the printer sharing.


2. Retry to change the driver. 


Thursday, October 8, 2020

Power On virtual machine: Failed to lock the file. Cannot open the disk. one of the snapshot disks it depends on


Problem:


Unable to Power on Virtual Machine

Unable to Consolidate Virtual Machine Snapshot disks.

Unable to Clone VM.


It gives below Symptoms.


1. While attempting to power on giving below error.

"Power On virtual machine:Failed to lock the file

See the error stack for details on the cause of this problem.

Time: 10/9/2020 6:37:25 AM

Target: MYVM001

vCenter Server: MYVCENTER.MYDOMAIN.COM

Error Stack

An error was received from the ESX host while powering on VM MYVM001.

Failed to start the virtual machine.

Cannot open the disk '/vmfs/volumes/594d0000-d290000-500-00000000002/MYVM001/MYVM001-000002.vmdk' or one of the snapshot disks it depends on. 

Failed to lock the file"


2. Virtual Machine showing warning " Consolidation Needed". But unable to perform snapshot consolidation. It gives below error.

VMware vSphere 6.x: An error occurred while consolidating disks: msg.snapshot.error-DISKLOCKED


3. /var/log/vmkernal.log shows below error.

 Failed to open file 'MYVM001-delta.vmdk'; Requested flags 0x4008, world: 1197120 [vmx-vthread-8], (Existing flags 0x4008, world: 43796 [unknown]): Busy


4. Command "vmkfstools -e vmfs/volumes/00000003-000230-000b-0123211000/VM001-000001.vmdk" shows below output.

Failed to open disk link /vmfs/volumes/5b4d1233-3e1234-1f5b-0123211000/VM001-000001.vmdk :Failed to lock the file (16392)Disk chain is not consistent : Failed to lock the file (16392) 


5. virtual machine disk descriptor file shows normal and CID chain is not broken.


Reason:

The VMDK or Delta VMDK is locked by one of the esxi in the cluster. Even if we move the VM in the particular Host, VM will fail to power on or consolidate disk.

To identify which disk is locked, refer the /var/log/vmkernal.log

Solution:

Identify the ESXI host which is currently have lock on the Delta vmdk or VMDK with below command. 


[root@I-MY-ESXI-01:/vmfs/volumes/152525252-26252526122-ED3455555555/MYVM001] vmfsfilelockinfo -p MYVM001-000001-delta.vmdk -v 172.11.13.3 -u administrator@vsphere.local

### -v  <vcenter IP>

### -u  <vCenter credential>


Output:

vmfsfilelockinfo Version 1.0

Looking for lock owners on "MYVM001-000001-delta.vmdk"

"MYVM001-000001-delta.vmdk" is locked in Exclusive mode by host having mac address ['00:20:b2:01:10:01']

-----------------------------------------------------------------

Found 2 ESX hosts from Virtual Center Server.

------------------------------------------------------------------

Searching on Host MY-ESXI-01.MYCOM.MYDOMAIN.COM

Searching on Host MY-ESXI-02.MYCOM.MYDOMAIN.COM

    MAC Address : 00:20:b2:01:10:01

Host owning the lock on the vmdk is MY-ESXI-02.MYCOM.MYDOMAIN.COM, lockMode : Exclusive

Total time taken : 0.38 seconds.


   Above output saying, disk is locked by MY-ESXI-02.MYCOM.MYDOMAIN.COM with MAC Address 00:20:b2:01:10:01.

Steps to Clear ESXi Lock:

1. Put the host in maintenance.

2. reboot the host.

Lock will be cleared during ESXi reboot and we will be able to power on or consolidate snapshot of VM.


VMware vSphere 6.x: An error occurred while consolidating disks: msg.snapshot.error-DISKLOCKED -SOLVED

Problem:

Unable to Power on Virtual Machine. It gives below Symptoms.


1. While attempting to power on giving below error.

"Power On virtual machine:Failed to lock the file

See the error stack for details on the cause of this problem.

Time: 10/9/2020 6:37:25 AM

Target: MYVM001

vCenter Server: MYVCENTER.MYDOMAIN.COM

Error Stack

An error was received from the ESX host while powering on VM MYVM001.

Failed to start the virtual machine.

Cannot open the disk '/vmfs/volumes/594d0000-d290000-500-00000000002/MYVM001/MYVM001-000002.vmdk' or one of the snapshot disks it depends on. 

Failed to lock the file"


2. Virtual Machine showing warning " Consolidation Needed". But unable to perform snapshot consolidation. It gives below error.

VMware vSphere 6.x: An error occurred while consolidating disks: msg.snapshot.error-DISKLOCKED


3. /var/log/vmkernal.log shows below error.

 Failed to open file 'MYVM001-delta.vmdk'; Requested flags 0x4008, world: 1197120 [vmx-vthread-8], (Existing flags 0x4008, world: 43796 [unknown]): Busy


4. Command "vmkfstools -e vmfs/volumes/00000003-000230-000b-0123211000/VM001-000001.vmdk" shows below output.

Failed to open disk link /vmfs/volumes/5b4d1233-3e1234-1f5b-0123211000/VM001-000001.vmdk :Failed to lock the file (16392)Disk chain is not consistent : Failed to lock the file (16392) 


5. virtual machine disk descriptor file shows normal and CID chain is not broken.


Reason:

The VMDK or Delta VMDK is locked by one of the esxi in the cluster. Even if we move the VM in the particular Host, VM will fail to power on or consolidate disk.

To identify which disk is locked, refer the /var/log/vmkernal.log

Solution:

Identify the ESXI host which is currently have lock on the Delta vmdk or VMDK with below command. 


[root@I-MY-ESXI-01:/vmfs/volumes/152525252-26252526122-ED3455555555/MYVM001] vmfsfilelockinfo -p MYVM001-000001-delta.vmdk -v 172.11.13.3 -u administrator@vsphere.local

### -v  <vcenter IP>

### -u  <vCenter credential>


Output:

vmfsfilelockinfo Version 1.0

Looking for lock owners on "MYVM001-000001-delta.vmdk"

"MYVM001-000001-delta.vmdk" is locked in Exclusive mode by host having mac address ['00:20:b2:01:10:01']

-----------------------------------------------------------------

Found 2 ESX hosts from Virtual Center Server.

------------------------------------------------------------------

Searching on Host MY-ESXI-01.MYCOM.MYDOMAIN.COM

Searching on Host MY-ESXI-02.MYCOM.MYDOMAIN.COM

    MAC Address : 00:20:b2:01:10:01

Host owning the lock on the vmdk is MY-ESXI-02.MYCOM.MYDOMAIN.COM, lockMode : Exclusive

Total time taken : 0.38 seconds.


   Above output saying, disk is locked by MY-ESXI-02.MYCOM.MYDOMAIN.COM with MAC Address 00:20:b2:01:10:01.

Steps to Clear ESXi Lock:

1. Put the host in maintenance.

2. reboot the host.

Lock will be cleared during ESXi reboot and we will be able to power on or consolidate snapshot of VM.


Sunday, October 4, 2020

Windows 10: This App Has been blocked for your protection : User Account Control


Problem:


Unable to install an App in Windows 10. It gives error "User Account Control: This App Has been blocked for your protection"


Reason:


This error is displaying by Windows 10 because this application is from unknown publisher.


Solution:


Before applying this solution, make sure the application is from trusted publisher. Installing Apps from untrusted publisher may harm your system.

1. Open "Registry Editor" by executing "Start > Run > Regedit".

2. Go to Registry Path "HKEY_LOCAL_MACHINE\SOFTWARE\Microsoft\Windows\CurrentVersion\Policies\System"

3. Open "EnableLUA" DWORD and change the value to "0"


4. Reboot the system.

5. Now you will be able to install this App, But make sure you revert the registry change once you finished the installation.


Saturday, September 26, 2020

VMware Virtual Machines Status Showing "Inaccessible", Datastore Showing Empty during Datastore Browse

 Problem:

1. Few VMware virtual machines located on a particular datastore showing inaccessible. 

2. Virtual machine inventory showing "/vmfs/volumes/volume_id/VM_name/vmname.vmx" instead of Virtual machine name and status is "inaccessible."

3. The datastore related to affected virtual machine showing empty during datastore browse. Unable to create new file or folder in datastore. But datastore status is showing healthy.

4. Unmount, detach, or attach datastore operations are not resolving this issue.

5. The "/var/log/vmkernel.log" shows the error similar to below.

     WARNING: J3: 4304 Replaying Slot 0 for journal at <FB 351800>: No Space left on device.

     WARNING: HBX: 4848: Replay of journal <FB 351800> on vol "Datastore_Name" failed. No    space left on device.


Reason:

This issue usually occurs because of LUN issues in storage side.

Possible reasons may be,

Storage LUNs are created as Thin Provisioned and storage pool is full.

Issues in storage Array.

Solution:

Engage Storage support team and fix the issue in SAN Storage side.

In case Storage Pool is full in storage, Extend storage pool or Make some free space by deleting unused LUN.


Nutanix guest vm crashing with error "DPC WATCHDOG VIOLATION"

Problem:

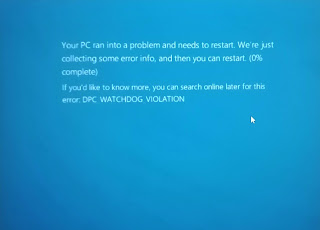
Nutanix AHV guest VMs with windows OS crashes intermittently with error "your pc ran into a problem and needs to restart. DPC WATCHDOG VIOLATION".

your pc ran into a problem and needs to restart."DPC WATCHDOG VIOLATION".

Reason:

This issue usually observed whenever Windows guest VM is running with old or corrupted or incompatible Nutanix Virtio drivers. 

Solution:

Download and install latest Nutanix Virtio drivers from Nutanix support portal, downloads > AHV > Virtio section. 

Nutanix Support Portal 


Monday, August 31, 2020

RDP Error: An authentication error has occurred the function requested is not supported . This could be due to CredSSP encryption oracle remediation

 Problem:

Unable to connect server via remote desktop. Getting Error 

"An authentication error has occurred the function requested is not supported .This could be due to CredSSP encryption oracle remediation"


Reason:

This issue will happen whenever you trying to access MS updated server from non updated client or vise versa. Microsoft released the security patches for RDP / CREDSSP which need to install on both client and server.

Solution:

Solution 1: Install latest Microsoft Update patches on Client and Server. This is the recommended and secure solution.

Solution 2: Disable Remote Desktop Network Level Authentication. If you have difficulty to apply solution 1, this option you can use as workaround option till installing latest patches on client and Server.

Steps: 

1. Right Click "Computer", Go to "System Properties", "Remote".

2. Ensure "Allow remote connections to this computer" is checked.

3. Uncheck "Allow connections only from computer running network level authentication" option


Solution 3:

In case you are unable to perform solution 1 and solution 2, example:- You are unable to install the latest patches or you are unable to disable Remote Desktop Network Level Authentication because server is unable to access via RDP or Console, This option you can use as workaround.

Steps:

1: On RDP Client, Open "Local Group policy Management " by typing "gpedit.msc" on START> RUN.

2. Go to "Computer Configuration > Administrative Template > System > Credentials Delegation"

3. Double Click "Encryption Oracle Remediation

4. Choose enabled and choose Protection Level as "Vulnerable

5. Now you will be able to connect the server by RDP, But strongly recommended to install latest MS patches on both client and Server and revert this changes back to be secure.